Archives

How To Install Windows 7 From A USB Key


Usually when you need to install a fresh copy of windows 7 or Vista, you insert the DVD, restart you computer and begin the process but what if you want ti install windows on a notebook with no optical drive? Well don't worry you can do it by using a USB key, this is how you can do it (It is very important to follow step-by-step)

Requirements

1- 4GB USB Key
3- Windows 7 installation disc

Let's Begin

1- Plug in your USB key and back up any data stored on it
2- You need to format the USB before proceeding
3- After format process is done click Start and type cmd in the search field
4- When cmd.exe appears, Right-click > Run As Administrator


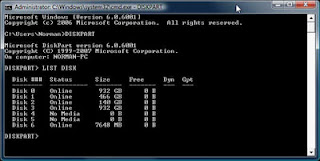
5- Type diskpart and press Enter (to enter the Disk Partition command line tool)
6- Type list disk and press Enter (to reveal a list of all your active disks each of which is associated with a number. Make a note of which one is your USB key, based on the capacity. In our screenshot below, our USB drive is Disk 6 (8GB)


7- Type Select Disk # and press Enter (Where # is the number of your USB disk. We typed Select Disk 6)
8- Type Clean and press Enter (removes any existing partitions from the USB disk, including any hidden sectors)
9- Type Create Partition Primary and press Enter (Creates a new primary partition with default parameters)
10- Type Select Partition 1 and press Enter (Focus on the newly created partition)
11- Type Active and press Enter (Sets the in-focus partition to active, informing the disk firmware that this is a valid system partition)
12- Type Format FS=NTFS and press Enter (Formats the partition with the NTFS file system. This may take several minutes to complete, depending on the size of your USB key.)
13- Type Assign and press Enter (Gives the USB drive a Windows volume and next available drive letter, which you should write down. In our case, drive L was assigned.)
14- Type Exit and press Enter (Quits the DiskPart tool)


15- Insert your Windows 7 install DVD into your drive, copy all of the files inside it to a folder on your Desktop. We put the disc contents in a folder named Windows 7


16- Run cmd as administrator again (like in step 4)
17- Now you need to locate the folder on your desktop holding the windows 7 content by using cmd. to do this follow me step-by-step
18- Right-click > Properties on your Windows 7 folder on your desktop


19- Near the location label is the path of your folder as shown in the picture above C:\Users\YOUR USERNAME\Desktop
20- Now back to the cmd, type cd\ and press Enter
21- Type cd users and press Enter
22- Type cd YOUR USERNAME and press Enter (you should enter your username, let's say the path of your Windows 7 folder is C:\Users\Geek Tutor\Desktop, then you should type cd geek tutor in this step)
23- Type cd desktop and press Enter
24- Type cd windows 7 and press Enter (replace windows 7 with the folder name that you chose earlier)
25- Type CD Boot and press Enter (This gets you into the boot directory)
26- Type Bootsect.exe /nt60 L: and press Enter (where L is the drive letter assigned to your USB key from previous steps)

Important: If you’re currently running 32-bit Windows Vista or 7, Bootsect will only work if you use the files from the 32-bit Windows 7 install disc. The Bootsect executable from the 64-bit version will not run in 32-bit Vista.

27- Now you need to copy all the files from the folder on your desktop (in our case Windows 7) and paste them into your USB Drive
28- Now your USB is ready, plug it into the target computer and don't forget to change the boot order by accessing the BIOS settings (by clicking F2 or F12 while booting). You should reorder the boot order by putting the USB as first device, now save the settings (click F10 then Yes) and restart your computer. The loading will start if you set the order in the correct way

Note: Some computers don't support booting USB drives first

This tutorial uses cmd.exe to create a bootable USB to install Windows 7/Vista, you can find many ready applications that will do all the above steps.
Read more ...

Shorten You Links The Easiest & Fastest Way

Geek Tutor


Sharing links on Facebook, Twitter, My Space or any other site is a daily action that everyone uses to show what they read, what they like on the internet or for any other purpose, but when your link is too long it becomes annoying to share and it might take some space so this why it is necessary to shorten such links. This tutorial will show you the easiest and fastest way.

1- Navigate to www.bitly.com


2- Copy and paste your long link in the box and click Shorten


3- Here you go a short link is given to you which you can use instead of the other long one, click Copy to copy the new short link and use it wherever you want


4- Enjoy your short link which take a short place on any website sponsored by bitly.com
Read more ...

Download, Install, Register & Update Internet Download Manager (IDM)

Geek Tutor


It is the number one download manager with no doubts and it the most used download manager. This is an application that you really want to install on your computer because not having it would be a big big mistake. This tutorial will help you download the latest version of IDM, install it, register it and update it when necessary.

Downloading & Installing IDM

1- Navigate to the download page of Internet Download Manager by clicking Here and download the latest version of IDM from their website.
2- After installing the application make sure to exit it before proceeding, to do this you should Right-Click on the IDM icon near the clock and click Exit


Registering IDM

3- Download the patch Here
4- Your antivirus might detect this patch as virus which is not, it is only an unwanted application that can do no harm to your computer so be sure that you can proceed without having any fears.
5- Extract the patch (Password: 123) and place it inside the installation directory of IDM (By default: C:\Program Files\Internet Download Manager Or C:\Program Files (x86)\Internet Download Manager for 64bit users)
6- Now you should run the patch as administrator, to do this Right-Click > Run As Administrator on the patch
7- Click Patch
8- If the patch displayed a message saying File Not Found! Search For It click Yes and browse for idman.exe in the installation directory of IDM. If the patch found idman.exe automatically you will be prompted to enter your FName (First Name) and your LName (Last Name) and click Ok
9- Now you are ready to use IDM the ultimate download manager

Updating IDM

After updating IDM to a newer version a message saying that IDM was registered with a fake ID will pop out on the screen click Ok then click Cancel when it requests a first name, last name, email and serial number. To register the application again you should repeat steps 5 till 9 form the registration category above.
Read more ...

Shortcut to Show/Hide Hidden Files

Geek Tutor , ,


This tutorial will teach how to create a shortcut to show or hide hidden files on your computer. It's a simple visual basic script that will take effect immediatly after double-clicking on it. It's a fast way to show or hide your hidden files instead of navigating to control panel > folder options and choose to show or hide the files.

1- Open Notepad
2- Copy and paste the following code into notepad

Set sh = CreateObject("WScript.Shell")
theKey = "HKCU\Software\Microsoft\Windows\CurrentVersion\Explorer\Advanced\Hidden"
setHidden = sh.RegRead(theKey)
If setHidden = 1 Then
setHidden = 0
MsgBox "System and hidden files will no longer appear in Explorer.",64,"Hidden File Exchange"
Else
setHidden = 1
MsgBox "System and hidden files will appear in Explorer.",64,"Hidden File Exchange"
End If
sh.RegWrite theKey,setHidden,"REG_DWORD"
Set sh = Nothing

3- Save it as anything.vbs (you can name it any name you choose as long as you don't include spaces and the extension must be .vbs (In the Save as type panel choose All Files, this is a very important step so the script is saved as vbs)
4- This works only on Vista/Seven when User Account Control (UAC) is disabled because it needs access to the registry.

How To Use It
Just double-click on the script, if you are showing your hidden files they will become hidden and vice versa. You should notice the change without restarting windows all you have to do if you noticed a delay is pressing F5 on your keyboard to refresh.

Download a ready-to-use hiddenfiles.vbs by clicking Here
Read more ...

Recover Your Dial-Up Connection's Username & Password

Geek Tutor ,


Although it does not happen very often, loosing or forgetting your dial-up connection's username or password is a problem that you might face which can make you nervous if you can't get in touch with the person who knows the correct username and password but don't forget that your computer stores the combination of username and password once you entered it the first time, you just need to find a way to tell the computer to display them for you this tutorial will help do that.

1- In this tutorial you will use a program called Dial-Up Pass
2- To download the application just click Here
3- Once the download process is finished double-click on the program
4- Here it is, every combination of username and password for every dial-up connection is displayed in front of you, all you have to do is save them as a precaution for the next time you forget it
5- We are using the 2.45 version of Dial-Up Pass because it is tested.
Read more ...

How To Find Your Computer's Boot Time

Geek Tutor ,


Ever wanted to know how much time does your computer take to boot? Is it slow or fast? This tutorial will help answer your question not just in the purpose of just knowing, you can benefit a lot from knowing your computer's boot time how? You can test how much time it takes to boot before and after installing an application such as an antivirus or any other app.

1- Open Notepad
2- Copy & paste the following code into notepad

Option Explicit
On Error Resume Next
Dim Wsh, Time1, Time2, Result, PathFile, MsgResult, MsgA, AppName, KeyA, KeyB, TimeDiff
MsgA = "Please close all running applications and click on OK."
KeyA = "HKEY_CURRENT_USER\Software\RestartTime\"
KeyB = "HKEY_CURRENT_USER\Software\Microsoft\Windows\CurrentVersion\Run\RestartTime"
AppName = "Reboot Time Test"
Set Wsh = CreateObject("WScript.Shell")
PathFile = """" & WScript.ScriptFullName & """"
Result = wsh.RegRead(KeyA & "Times")
if Result = "" then
MsgResult = Msgbox (MsgA, vbOKCancel, AppName)
If MsgResult = vbcancel then WScript.Quit
Wsh.RegWrite KeyA & "Times", left(Time,8 ), "REG_SZ"
Wsh.RegWrite KeyB, PathFile, "REG_SZ"
Wsh.Run "cmd /c Shutdown -r -t 00", false, 0
else
Wsh.RegDelete KeyA & "Times"
Wsh.RegDelete KeyA
Wsh.RegDelete KeyB
TimeDiff = DateDiff("s",Result,left(Time,8 ))
MsgBox "Your computer reboots in " & TimeDiff & " seconds", VbInformation, AppName
end if
wscript.Quit

3- Save it as anything.vbs (make sure you choose .vbs as extension for your file & don't include spaces if you choose a multiple words name for example if you choose to name it " boot time test ", you should enter boottimetest.vbs NOT boot time test.vbs)
4- In the Save as type choose All Files (Very Important !!)
5- Double-click on the file, you will be asked to save and close all your work because your computer is about to restart. Click Ok to restart
6- When windows starts again a message with the number of seconds your computer took to boot will be displayed on your desktop.

To download a ready-to-use boottimetest.vbs click Here
Read more ...

Block/Allow Internet Access For An Application

Geek Tutor ,


Sometime it is necessary to block internet access from a certain application due to the use of a crack or patch or a serial number that can be blacklisted if the program was updated. This tutorial will teach you how to block internet access by adding a rule to the host file

1- Open Notepad
2- Copy & paste the following into notepad

Windows Registry Editor Version 5.00
[HKEY_CLASSES_ROOT\exefile\shell]
[HKEY_CLASSES_ROOT\exefile\shell\Block Internet Access]
[HKEY_CLASSES_ROOT\exefile\shell\Block Internet Access\command]
@="netsh advfirewall firewall add rule name=\"%1\" dir=out action=block program=\"%1\""
[HKEY_CLASSES_ROOT\exefile\shell\Allow Internet Access]
[HKEY_CLASSES_ROOT\exefile\shell\Allow Internet Access\command]
@="netsh advfirewall firewall delete rule name=\"%1\""

3- Save it as Install.reg

4- Open Notepad again
5- Copy & paste the following into notepad

Windows Registry Editor Version 5.00
[-HKEY_CLASSES_ROOT\exefile\shell\Block Internet Access]
[-HKEY_CLASSES_ROOT\exefile\shell\Allow Internet Access]

6- Save it as Uninstall.reg
7- Now you have 2 files Install.reg & Uninstall.reg

Install.reg
Is used to integrate 2 options into right-click context explorer menu, the 2 options are Allow Internet Access & Block Internet Access. Double-click on Install.reg then click Yes to integrate them.

Uninstall.reg
Is used to uninstall the previously mentioned context explorer menu options. Double-click on Uninstall.reg then click Yes to remove integration.

How To Use It:
From now on, when you need to block internet access from an application just right-click on it and choose Block Internet Access. To allow internet access right-click on the application and choose Allow Internet Access

Note: When you want to uninstall the integration from the context explorer menu make sure that you allowed internet access for all application if previously you blocked it.

If you are having any problem creating the 2 files download Install.reg Here and Uninstall.reg Here
Read more ...

Send A Secure & Encrypted Email

Geek Tutor ,


Ever had to send a message to someone that contains sensitive information and were afraid that it may end up in the wrong hands, well everyone has experienced this problem. In this tutorial we will introduce an email provider that gives you the option of securing and encrypting your message so you don't feel paranoid anymore.

1- Go to www.hushmail.com

2- First you need to sign up for free email


3- Now you need to fill with the appropriate information such as email address, passphrase ... A very important step is to enable Java because random data will collected based on the movement of your mouse to further protect your security. When you finish click Create ******@husmail.com now

4- If everything went well you should see the below message


5- Click To Sign in now, click here


6- Now enter your full hushmail address (it should be their at this step) and click Sign In >>


7- The above message should appear now telling you that the hush encryption engine may take up to 3 minutes to install software for hush communications. Wait for it to finish and you will notice the below message


8- Now enter your passphrase and click Authenticate


9- To create a new message click Compose


10- Enter the email of your friend(s) and type your message in the blank field, when done with your message click on Message Options


11- Now be sure to check Encrypt Message, the others are optional. Now enter a security question and fill in with its answer. Only people who knows the answer to your secret question can read you message.


12- As shown above you can attach any kind of documents to your message with a limit for your total message of 25 MB

13- Click Send, your secure and encrypted message will be delivered to your friends

14- Enjoy secure emailing :)
Read more ...

How To Send Self-Destructing Messages

Geek Tutor ,


Every kid watching spy shows dreams about self-destructing messages that will disappear forever. So how about sending a message to your friend without anyone else ever being able to see afterwards. Yes everything is possible when having the internet at your disposal. This tutorial will show you how you can send a message that can self-destruct or self-delete after a specific amount of time which you can specify. Also you have the option of password-protect your message & prevent anyone from copying it here's how

1- Go to www.burnnote.com

2- Once you open the website you are ready to begin typing your message


3- After typing your top secret message click on Options


4- First choose how your message will be displayed. You are given 3 options: Plain Text, Short Phrases and Spyglass, if you choose Plain Text anyone would be able to copy your message but if you choose Short Phrases or Spyglass your message won't get copied. Now make sure to check the box next to Timer when note is opened and set the time that will indicate after how many seconds the message will self-delete after been opened. For the last option you can choose to password protect your message (if you are paranoid)

5- After finishing setting up your message click Send


6- Now copy the link generated by clicking on COPY LINK

7- Voila! now you are ready to send your message. Sign in to your mail and send the link to your friend.

8- Once your friend receives the mail and open your message by clicking on the link the timer will start automatically. When the timer reaches the number of seconds you chose earlier the message will self-destruct and vanish forever. If you set a password for your message the timer won't start until your friend enters the password and opens your message.

9- Registering to the website is optional

Your childhood dream just came true yyyyyeessssss :)
Read more ...

Waterfox - The 64bit Version Of Firefox


If you are a Firefox user you will love this post. Why? because it introduces the new and speedy 64bit version of Firefox. It's called Waterfox. Going from 32bit Firefox to 64bit Waterfox is an option that you should consider specially if you have a 64bit system.

Why Using 64bit ?

A big portion of computers these days have the ability of running 64bit operating systems and application. 64bit operating systems enables you to use more than 3.25 GB of RAM which can increase the performance of your system. 64bit also improves memory management. A 64bit system has the ability of running 32bit applications but in that case you won't get the benefits that 64bit software can provide.

Downloading & Installing

Click Here to visit Waterfox website and download the latest version from their download page. After downloading the latest version of Waterfox don't start the installation because you need to install these apps first.

1- Download and install Visual C++ 2010 Redistributable Package (x64) if necessary by clicking Here.
2- Install 64bit version of plugins if not already done. The most 3 important plugins that you should consider installing their 64bit version are: Flash Player - Java - Silverlight (Click on each one of these apps to navigate to each one's download page)

Now you are ready to install Waterfox, double-click the setup you already downloaded, make it as your default browser if you choose to. Enjoy downloading Add-ons which can make your surfing very easy and comfortable, Enjoy

Read more ...
 
Copyright 2010 Geek Tutor